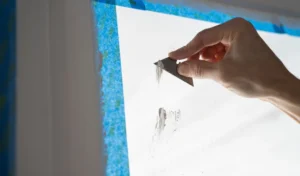
Painting is one of the simplest and most cost-effective ways to give your place a new look when it comes to home remodelling. However, even the most experienced DIY painters and decorators may struggle with textured walls.
Fortunately, with the right handyman painting tools and techniques, you can achieve a professional-looking paint job on your textured walls without spending a fortune. In this post, provided by painters and decorators working with Fantastic Services, you will learn some of the best DIY painting techniques for textured walls that anyone, from the most experienced handyman to the most inexperienced DIY-er, may apply to get a beautiful and textured result.
Stamping Painting Technique
Stamping is a popular DIY painting technique for textured surfaces. Apply paint to a textured surface with a paint roller or brush, and then stamp a pattern on the surface with a stamping tool. Stamping tools are available at most hardware and paint stores, or you can manufacture your own by carving a pattern into a foam roller or sponge.
To begin, select the shade of paint you wish to use and apply a base coat to the wall. You can start stamping when the base coat has dried. Dip your stamping tool into the paint and carefully press it onto the wall, ensuring a consistent pattern. It is critical to use a light touch and avoid pressing too hard since this can distort the design.
You can use various stamping tools or overlay different colours of paint to create a more detailed image. You can also try out alternative stamping techniques, such as generating an ombre effect by blending two distinct paint colours together gradually.
Sponge Painting Technique
Another painting technique for textured walls is sponge painting. This technique involves applying paint to a wall using a sponge to create a textured look. Sponge painting can create a variety of effects, including a soft, subtle texture or a more bold and pronounced texture.
To begin, select two or three complementary colours that will provide the desired effect. Allow the wall to dry completely after applying a base coat of the lightest colour. Then, dip a clean sponge into the second colour and dab it in a random pattern on the wall. If desired, repeat the technique with the third colour, mixing the hues together as you go.
Use a sponge with wider pores or cut a conventional sponge into a more irregular shape to generate a more prominent texture. Experiment with several approaches to get the desired effect, such as twisting the sponge or dragging it across the wall.
Sponge painting is an affordable and easy DIY painting technique that can add texture and interest to any room. It may also be utilised to achieve a number of effects, ranging from a rustic, natural appearance to a more contemporary, abstract design. With some handyman tools and painting supplies, anyone can master this painting technique and achieve results as if done from professional painters and decorators.

Colourwash Painting Technique
Colorwashing is a common painting method that may be used to a variety of surfaces, including textured walls. This technique involves applying a thinned-out paint wash to the surface, which allows the texture of the wall to show through while also creating a subtle and unique colour effect.
To accomplish this method, first apply a base layer of paint to your wall, which will act as the basis for the colour wash. Once the base coat has dried, mix a small amount of paint with water to create a thinner, more translucent paint mixture.
Apply the thinned-out paint mixture to the wall using a brush or roller, making sure to blend it in with the base coat. Then, using a sponge or rag, remove any excess paint or mix the colours together to get a more natural appearance. This painting method is ideal for adding depth and texture to your walls and can be tailored to any colour scheme or design sense. With the right tools and techniques, you can easily create a beautiful and unique colour wash on your textured walls.
Stippling Painting Technique
Stippling is a painting technique that includes putting small dots or flecks of paint to the surface to create texture. This technique is often used on walls with uneven or damaged surfaces, as it can help hide imperfections and create a more visually interesting finish.
To create a stippled effect, apply a base coat of paint in your desired colour. Once the base coat is dry, dip a stippling brush into a contrasting colour of paint and lightly tap it onto the surface in a random pattern, creating small dots or flecks of paint. The amount of paint used and the spacing between the dots may be altered to produce a range of effects, ranging from a subtle speckled finish to a more dramatic and textured appearance.
Stippling may be accomplished with a number of painting tools, such as brushes, sponges, and even crumpled-up paper.
Frottage Painting Technique
The frottage painting technique is a simple yet effective method of creating texture on walls. It involves rubbing or pressing a textured material such as burlap, sponge or crumpled paper against the wet paint to create a unique pattern. The painting technique is suitable for those who want to achieve a rustic or aged look on their walls.
To begin, select the texture you want to use and cut it to the desired size. Apply a base coat of paint to the wall, then press the texture into the wet surface. Remove the texture with care and let the paint to dry completely. Once the base coat is complete, add a second layer of contrasting paint and press the texture against the wall while it is still wet. When you remove the texture, the base coat colour shows through, giving a unique and attractive pattern.
Dragging Painting Technique
Dragging is a popular painting technique that creates a soft and subtle texture on walls. It is a flexible method that may be applied using a number of painting instruments, such as brushes, rags, and sponges.
To achieve the dragging effect, start by applying a base coat of paint and letting it dry completely. Then, apply a second coat of paint in a contrasting colour. While the second coat is still wet, gently drag and mix the wet paint in a vertical or horizontal direction with a dragging implement such as a dry brush or a piece of cloth.
As a consequence, the texture is delicate and subtle, adding depth and character to any area. This technique is particularly effective in creating a faux finish that resembles the look of natural materials, such as linen or wood.

The Easiest Way to Textured Wall DIY Painting
Textured walls can add dimension and interest to any room in your home. There are various DIY painting techniques you may employ to obtain the desired result, whether you want a delicate, understated appearance or something more striking.
One of the simplest methods to create texture to your walls is to use a textured paint roller. These rollers are designed to apply a textured pattern to your walls as you paint, eliminating the need for any additional tools or techniques. Simply roll the paint onto the wall as you would with a regular roller, and watch as the textured pattern begins to emerge.
Another option is to use drywall joint compound to create a textured effect. This involves applying the joint compound to the wall with a trowel, then using a specialised tool such as a texture brush or sponge to create the desired pattern. Once the joint compound has dried, you can then paint over it to achieve the desired colour and finish.
Conclusion
DIY painting techniques for textured walls can give your home a unique and personalised look without breaking the bank. By using handyman tools and painting tools such as sponges, rollers, and brushes, you can achieve a variety of textures and finishes. The techniques mentioned, such as stamping, sponge painting, colour washing, stippling, frottage, and dragging, are all great options for adding depth and dimension to your walls. These strategies, whether you’re a handyman or a novice, are simple to learn and apply with a little time and effort.